
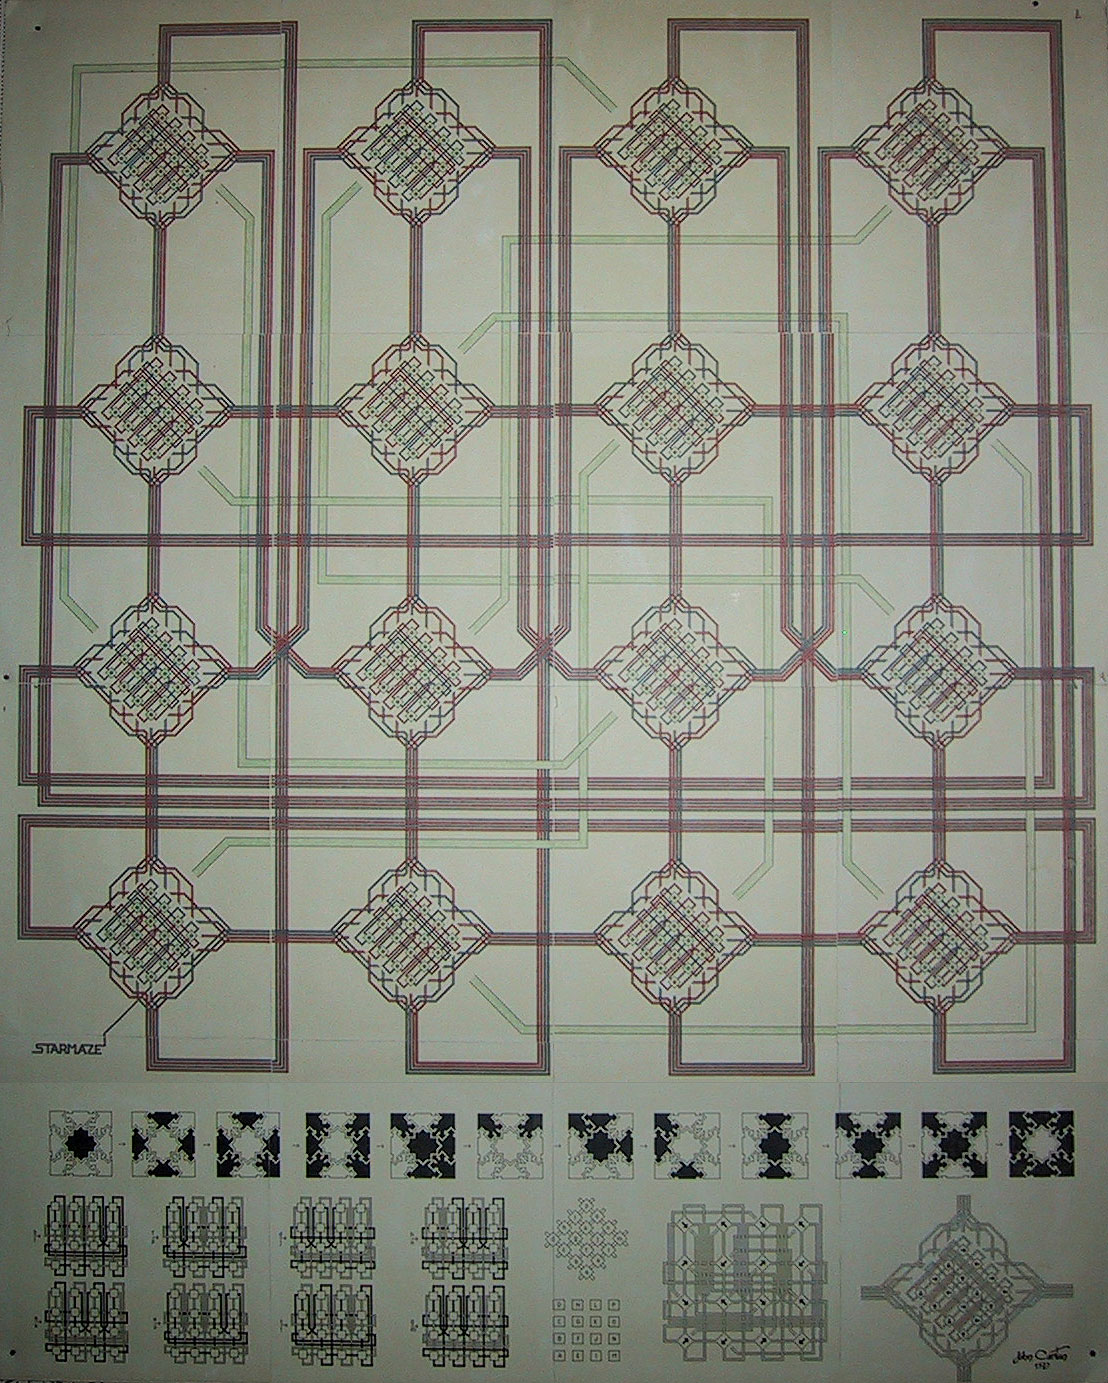
 The starmaze solution poster
reveals the solution to the starmaze puzzle, and displays the basic design of the starmap with the solution path in color.
But it is not at all obvious how to read the original map.
This page will explain how to follow the solution path, and how to read the map itself.
(For more information on the history of the starmaze puzzle and map, see Mapping the Maze).
The starmaze solution poster
reveals the solution to the starmaze puzzle, and displays the basic design of the starmap with the solution path in color.
But it is not at all obvious how to read the original map.
This page will explain how to follow the solution path, and how to read the map itself.
(For more information on the history of the starmaze puzzle and map, see Mapping the Maze).
Let's begin by reviewing the puzzle. The challenge is to find the (shortest) path from the starting pattern, an open cell surrounded by eight closed cells, to its inverse: the ending pattern, a closed cell surrounded by eight open cells. This can be accomplished in eleven steps (for a total solution path length of twelve including the ending pattern). As it turns out, there are 1920 different such solution paths. The particular solution shown on the map was arrived at (entirely on her own) by an old girlfriend of mine, Dionne Baker.

Starmaze patterns are represented on the map by diamond-shaped "rooms" and the transformations from
one pattern to the next are represented by "pipes".
 The twelve solution patterns shown above were generated by my Starmaze Explorer program.
Notice the tiny arrows inside the colored cells. Each arrow shows the actual direction
of the pipe corresponding to that cell as it leads away from the room on the map
corresponding to that pattern.
The twelve solution patterns shown above were generated by my Starmaze Explorer program.
Notice the tiny arrows inside the colored cells. Each arrow shows the actual direction
of the pipe corresponding to that cell as it leads away from the room on the map
corresponding to that pattern.
I added the alternating red and blue colors because the starmap is a color maze. In a red/blue color maze, if you enter a room through a red pipe, you can only exit the room through one of the blue pipes, and vice versa. Because of this color rule, each room in the map actually represents two different starmaze patterns. In fact, both the starting and ending patterns are represented by the first room we come to: pattern 16 when we enter through a blue pipe, and pattern 495 when we return, in the final step, through a red pipe.
 This simplified map, also generated by Starmap Explorer, shows where each of the twelve solution patterns
appears on the actual starmap. The map displays tiny upward-pointing triangles in rooms which must be exited
through a red pipe ("sun rooms"),
and downward triangles in rooms which must be exited through a blue pipe ("moon rooms").
Notice that the first four rooms along the path contain both upward and downward triangles;
these rooms correspond to both the first four and the last four patterns of the solution.
So the overall path involves coming in (steps 1 to 4), turning around (steps 5 to 8),
and going out the way you came in (steps 9 to 12).
This simplified map, also generated by Starmap Explorer, shows where each of the twelve solution patterns
appears on the actual starmap. The map displays tiny upward-pointing triangles in rooms which must be exited
through a red pipe ("sun rooms"),
and downward triangles in rooms which must be exited through a blue pipe ("moon rooms").
Notice that the first four rooms along the path contain both upward and downward triangles;
these rooms correspond to both the first four and the last four patterns of the solution.
So the overall path involves coming in (steps 1 to 4), turning around (steps 5 to 8),
and going out the way you came in (steps 9 to 12).
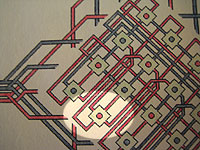
 Before entering the maze itself, we should discuss the overall structure of the map.
The first thing to notice is that the diamond-shaped rooms in arranged into larger diamond-shaped
arrays, or "microcosms". There are 16 rooms in each microcosm, labeled starting at the
bottom from a to p. Small "micropipes" connect these rooms; four colored micropipes
from the northwest, northeast, southeast, and southwest edges of each room diamond.
These micropipes actually correspond to the yang cells located in the north, east, south, and west
positions of a starmaze pattern. So to translate a room on the map to a pattern, the first
thing you have to do is rotate the room and its pipes 45 degrees clockwise.
Before entering the maze itself, we should discuss the overall structure of the map.
The first thing to notice is that the diamond-shaped rooms in arranged into larger diamond-shaped
arrays, or "microcosms". There are 16 rooms in each microcosm, labeled starting at the
bottom from a to p. Small "micropipes" connect these rooms; four colored micropipes
from the northwest, northeast, southeast, and southwest edges of each room diamond.
These micropipes actually correspond to the yang cells located in the north, east, south, and west
positions of a starmaze pattern. So to translate a room on the map to a pattern, the first
thing you have to do is rotate the room and its pipes 45 degrees clockwise.
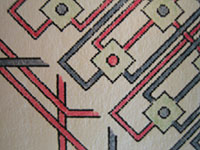
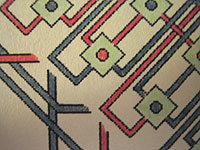
There are also 16 microcosms in the map, labeled from A to P. They are connected
with "macropipes" and "center-pipes". A macropipe doesn't connect directly with a room.
Instead, as it approaches one side of a microcosm, the bundle of four pipes comprising a macropipe
branches into seven pipes that line up perfectly with the seven rows or columns
within a microcosm diamond array. So, to journey out of a room through a macropipe, start at
the north, east, south, or west tips of the room diamond and move your finger north, east, south
or west until you enter of the macropipe's seven openings. It it's the right color, you can
then follow it to a neighboring microcosm. When you come out the other end, continue moving
in the same direction until you reach a room that was in the same relative position within the
new microcosm as the room you left from.
 The four macropipes leading from the tips of a room
diamond actually correspond the four yin (corner) cells of a starmaze pattern. So, again, you
have to rotate 45 degrees clockwise to translate a macropipe to its corresponding cell.
The four macropipes leading from the tips of a room
diamond actually correspond the four yin (corner) cells of a starmaze pattern. So, again, you
have to rotate 45 degrees clockwise to translate a macropipe to its corresponding cell.
The largest pipes on the map are the center-pipes. Like the macropipes, each center-pipe connects a room in one microcosm to another room in the same relative position within another microcosm. But the center-pipes are not colored. Instead, the color of a specific transformation is determined by a dot in the center of each room. If the dot is the right color you can jump "into" it, follow the center pipe to another microcosm, and come up inside the corresponding room in that new microcosm. This corresponds to choosing the center cell of a starmaze pattern, and is the only choice available from the first room in the maze.
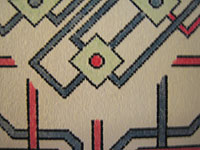
We are now ready to follow the solution path across the starmap step by step.
Each step will include a detailed view of the current room.
Since the starmap poster only shows the colors of the solution pipes,
I will instead use photos of my original hand-colored map.
![]()
Step 1: Pattern 16, Position +Aa

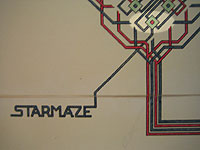 We enter the maze through a blue pipe extending up from the letter 'E' in STARMAZE.
Strictly speaking, this pipe is not actually a part of the maze itself;
it merely serves to direct wanderers into the starting room, located at the southern tip of microcosm A.
We enter the maze through a blue pipe extending up from the letter 'E' in STARMAZE.
Strictly speaking, this pipe is not actually a part of the maze itself;
it merely serves to direct wanderers into the starting room, located at the southern tip of microcosm A.
There are four blue micropipes extending from this room. A blue macropipe can be seen nestled just south of the entrance pipe and two more blue macropipes are visible directly west and east of the room. Not shown in this photo is the macropipe directly north of the room, positioned above the central column of the microcosm - but it, too, is blue.
Since we entered through a blue pipe, all eight of these pipes are unavailable to us. Our only choice is to use the center-pipe, indicated by the red dot in the center of the room. This is analogous to the starting pattern which has only one open cell - in the center.
To travel through the center-pipe, we simply follow the large pipe which snakes from
the northeast edge of microcosm A and leads two microcosms over and two up to the southwest edge of microcosm K.
We then arrive at room a in the southern tip of Microcosm K. In position notation, a plus sign is used
to indicate sun rooms, and a minus sign to indicate moon rooms. Since we've gone from a sun room to a moon room
in a different microcosm, our position has changed from +Aa to -Ka.
![]()
Step 2: Pattern 325, Position -Ka

 We still have a red dot in the center of the room, but we cannot use it.
Since we entered the room through a red pipe, we must exit through a blue one.
As before, there are four blue micropipes extending from this room - we are now free to use any of one of them.
We still have a red dot in the center of the room, but we cannot use it.
Since we entered the room through a red pipe, we must exit through a blue one.
As before, there are four blue micropipes extending from this room - we are now free to use any of one of them.
The macropipes, however, are still not available. In this photo you can see that the macropipes directly west, east, and south of room Ka are now red; the macropipe directly north is red as well. So we have four choices, equivalent to the four open yang cells in the pattern.
We choose to take the the south cell (marked on the pattern in blue), which is cell number 1 using the Lo Shu numbering system. To figure out which of the four micropipes corresponds to cell 1, simply rotate the micropipes 45 degrees clockwise (or the pattern 45 degrees counter-clockwise). Doing this we see that the micropipe extending from the southeast edge of the diamond-shaped room is equivalent to cell 1. This is why the tiny arrow inside cell 1 is pointing southeast.
Moving through a micropipe always carries you to a different room in the same microcosm.
In this case the southeast pipe takes a few turns and snakes its way to room l (lower case L)
just southwest of the northernmost tip of the microcosm.
You can see the path of this blue micropipe in the example microcosm shown above.
![]()
Step 3: Pattern 484, Position +Kl

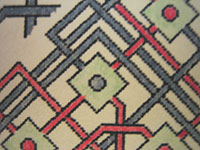 It is now once again necessary to move through a red pipe. This means we still can't move
through the center (since the center dot is blue). Although you can't see them in the photo
at right, the north and west macropipes are also blue. This leaves five choices:
the south and east macropipes, and the three red micropipes (all but the one exiting to the northwest.)
It is now once again necessary to move through a red pipe. This means we still can't move
through the center (since the center dot is blue). Although you can't see them in the photo
at right, the north and west macropipes are also blue. This leaves five choices:
the south and east macropipes, and the three red micropipes (all but the one exiting to the northwest.)
If you compare the map to the pattern, you may notice something odd. If you rotate the pattern 45 degrees counter-clockwise, you will see that the two closed yin (corner) cells do indeed correspond to the two blue north and west macropipes. But the one closed yang cell on the south does NOT correspond to the southeast micropipe as it normally would. In fact, the micropipes are up-side down and backwards. As confirmation, notice that the little arrow in the north yang cell (cell number 9, in red) is pointing southeast instead of northwest.
The reason for this as that the orientation of room +Kl is different than the preceding two rooms. In fact, there are 16 different possible orientations in the starmaze, and these orientations vary from room to room. More precisely, the orientation of the four yin cells vary from microcosm to microcosm, and the orientation of the four yang cells vary from room to room within each microcosm. For this reason, it is necessary to consult the Orientation Map any time you want to understand how a pattern relates to a given room.
The Orientation Map consists of a diagram of room orientations, a diagram of microcosm orientations,
and matrix of possible combinations. If you look at room l (lower case L) in the room diagram, you will see an arrow pointing south.
This corresponds to the fourth column of the matrix. If you look at microcosm K in the microcosm diagram,
you will see an arrow pointing northeast. This corresponds to the first row of the matrix. If you look up
 the compass diagram in row 1, column 4 of the matrix, you will find the figure at right.
In compass diagrams, blue squares refer to yang cells (micropipes) and red squares refer to yin cells (macropipes).
Here we see that, indeed, the yin cells are "normal" but that all four yang cells are reversed. So when we
rotate this diagram 45 degrees counter-clockwise, we see that the north yang cell does indeed correspond to
the southeast micropipe. This is the pipe we will follow.
![]()
Step 4: Pattern 238, Position -Kc

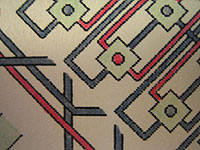 Our red micropipe turns, travels southwest, and enters room c from the northwest.
We must now choose a blue pipe and our situation has changed considerably. The center
is still closed to us, but now all four macropipes are open (blue), and two of the four
micropipes (northeast and southwest) are open - for a total of six choices.
Our red micropipe turns, travels southwest, and enters room c from the northwest.
We must now choose a blue pipe and our situation has changed considerably. The center
is still closed to us, but now all four macropipes are open (blue), and two of the four
micropipes (northeast and southwest) are open - for a total of six choices.
Since we have not changed microcosms, the orientation of our yin cells has not changed.
Consulting the orientation map for room c, we discover that the yang cell orientation is now
back to normal. We now decide to take our first macropipe and leave microcosm K. Since
the yin cells are perfectly symmetrical at the moment, it really doesn't matter which one we take;
following Dionne's path, we take the south pipe, which corresponds to the southwest yin cell (above, in blue).
If you position your finger on the southern tip of the room c diamond and move it straight down
you will find the opening of a blue macropipe. Follow this down and it will join into a bundle
of four pipes and carry you to the microcosm directly to the south, microcosm J. When the macropipe
opens again, continue moving your finger south until you reach room c.
![]()
Step 5: Pattern 123, Position +Jc

 We are now looking for red pipes and find six of them. The center pipe is open to us again,
as are three macropipes (every one except for the one to the north which we just came through)
and two micropipes. Consulting our orientation map we confirm that changing microcosms has
affected the orientation of the yin cells.
We are now looking for red pipes and find six of them. The center pipe is open to us again,
as are three macropipes (every one except for the one to the north which we just came through)
and two micropipes. Consulting our orientation map we confirm that changing microcosms has
affected the orientation of the yin cells.

As you can see from the compass at left, the four yang cells are normal, but two of the four
yin cells, cells 2 and 8 (the northeast and southwest corners) are reversed. As it happens, though,
this won't affect us, since we have decided to take cell 6 in the southeast corner. As you can
tell by the little arrow in the red cell above, this corresponds to the eastern macropipe.
So we will once again be changing macrocosms, but this macropipe will not carry us due east.
Instead it takes a turn to the north and carries us all the way to the upper right corner of
the starmaze, in microcosm P. The room remains at c.
![]()
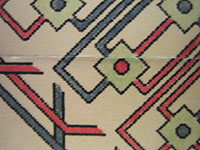
Step 6: Pattern 10, Position -Pc

 Arriving in room -Pc we find our choices now much constrained. The center pipe
and all four micropipes are now red, which means they are closed to us. Only
two of the four macropipes remain open (blue). If you look carefully at the photograph
you can see that the macropipe directly north of room c is blue; the east macropipe is open as well.
Arriving in room -Pc we find our choices now much constrained. The center pipe
and all four micropipes are now red, which means they are closed to us. Only
two of the four macropipes remain open (blue). If you look carefully at the photograph
you can see that the macropipe directly north of room c is blue; the east macropipe is open as well.
The orientation of the four yin cells in microcosm P is exactly the reverse of the situation in microcosm J. Now cells 2 and 8 are normal, but cells 4 and 6 (the northwest and southeast corners) are reversed. This corresponds to the east and west macropipes - which makes sense if you think about it. When we travelled through the east pipe from microcosm J, east was east and west was west. But now that same east pipe is west of microcosm P. So the "east pipe" is now to our west and vice versa.
Once again, though, the orientation is moot as we are now going to proceed through the unaffected north macropipe.
This will carry us up, around, and back all the way to the bottom - to microcosm M in the lower
right corner of the maze.
![]()
Step 7: Pattern 344, Position +Mc

 The orientation of the yin cells in microcosm M is now fully reversed: east is west, west is east,
north is south, and south is north. Only one macropipe remains open (red) - the one extending to
the east. The yang cells are still oriented normally and two of them are open.
The center cell is also open to us once again - so let's take it!
The orientation of the yin cells in microcosm M is now fully reversed: east is west, west is east,
north is south, and south is north. Only one macropipe remains open (red) - the one extending to
the east. The yang cells are still oriented normally and two of them are open.
The center cell is also open to us once again - so let's take it!
As in in our first move, the center-pipe will not cause a room change; we will remain in room c.
But the center-pipe, which opens to the northwest of microcosm P, will carry us half way across the
maze, over two and up two, to microcosm G. As discussed in the page on forms,
the is the central transformation. We are moving from pattern 344, a right-handed pattern of form 8,
to pattern 13, a left-handed pattern of form 7. We have now, in effect, turned around, and from here
on out we just need to find our way back to the entrance.
![]()
Step 8: Pattern 13, Position -Gc

 Having just travelled through the center, it is now closed to us (red), as are two of the
micropipes and three of the macropipes. It turns out that moving through the center never affects orientation.
So our situation is the same as it was before: all four yang cells are normal, and all four yin cells are reversed.
This now becomes important, as we are going to take the sole remaining macropipe. Although it corresponds
to cell 4 in the northwest corner, because of the orientation, the pipe will carry us to the east.
Having just travelled through the center, it is now closed to us (red), as are two of the
micropipes and three of the macropipes. It turns out that moving through the center never affects orientation.
So our situation is the same as it was before: all four yang cells are normal, and all four yin cells are reversed.
This now becomes important, as we are going to take the sole remaining macropipe. Although it corresponds
to cell 4 in the northwest corner, because of the orientation, the pipe will carry us to the east.
Step 9: Pattern 273, Position +Kc
 The photograph at the right should look familiar - it is the same one we saw in step 4.
We are now back in room c of microcosm K, but this time our address is +Kc instead of -Kc.
This means that we are now able to leave this room by precisely the same pipe (the northwest micropipe)
that we first used to enter this room in step 4 - which is just what we'll do. From this
point on, our path will take us back through the exact same pipes we used in the first four steps.
Our orientation is fully normal now, so the northwest pipe corresponds to cell 9. For the first
time in five moves, we finally leave room c and return to room l.
The photograph at the right should look familiar - it is the same one we saw in step 4.
We are now back in room c of microcosm K, but this time our address is +Kc instead of -Kc.
This means that we are now able to leave this room by precisely the same pipe (the northwest micropipe)
that we first used to enter this room in step 4 - which is just what we'll do. From this
point on, our path will take us back through the exact same pipes we used in the first four steps.
Our orientation is fully normal now, so the northwest pipe corresponds to cell 9. For the first
time in five moves, we finally leave room c and return to room l.
Step 10: Pattern 27, Position -Kl
 As you'll recall from the last time we were in room Kl, our yin cells have normal orientation,
but all four yang cells are reversed. Our goal is to move through the micropipe we used before,
the only blue micropipe available. Because of the orientation, it corresponds to cell 1 (the southern yang cell), but
leaves the room to the northwest (as indicated by the little arrow in the blue cell above).
As you'll recall from the last time we were in room Kl, our yin cells have normal orientation,
but all four yang cells are reversed. Our goal is to move through the micropipe we used before,
the only blue micropipe available. Because of the orientation, it corresponds to cell 1 (the southern yang cell), but
leaves the room to the northwest (as indicated by the little arrow in the blue cell above).
Step 11: Pattern 186, Position +Ka
 Our blue micropipe takes the same circuitous path it did before and carries us back to
room a in the southern tip of microcosm K. We are now positioned for the final transformation
in our solution path. Since we began by traveling through the center-pipe, it is now
time for us to do that again, this time moving in the opposite direction.
Our blue micropipe takes the same circuitous path it did before and carries us back to
room a in the southern tip of microcosm K. We are now positioned for the final transformation
in our solution path. Since we began by traveling through the center-pipe, it is now
time for us to do that again, this time moving in the opposite direction.
Step 12: Pattern 495, Position -Aa
 The center-pipe deposits us right where we started, in room a of microcosm A. But although
we are back in the same Aa diamond, our pattern is the inverse of the pattern we started with:
position -Aa instead of +Aa, 495 instead of 16. As a result, we can now do something we
couldn't do before: exit the maze through the blue pipe. In so doing, we have finally solved
the starmaze puzzle. Congratulations!
The center-pipe deposits us right where we started, in room a of microcosm A. But although
we are back in the same Aa diamond, our pattern is the inverse of the pattern we started with:
position -Aa instead of +Aa, 495 instead of 16. As a result, we can now do something we
couldn't do before: exit the maze through the blue pipe. In so doing, we have finally solved
the starmaze puzzle. Congratulations!
![]()
![]()
![]()
![]()